This year I decided I would finally plant the garden I have talked about for so long. I am actually into the second season now and have garlic, celeriac, celery, beetroot and many more wonderful things to look forward to harvesting. It is such a wonderful feeling to go out to the garden and pick herbs and vegetables straight from plants you have grown. Which is exactly what I did this morning; i noticed the chili plant's branches were getting heavy with fruit so I thought it was time to make a chili paste. while I was lightening the burden of my chili plant I noticed that our recent deluge of rain had encouraged some extra growth from my coriander and roquette so I now have an abundance of fresh greenery in my crisper that I'm using at every opportunity.
Wednesday, 15 June 2011
Monday, 13 June 2011
Chocolates
Here are some beautiful chocolates I made to take to an afternoon tea on the weekend. they were a real hit,the coffee truffles were my favourite.
I have to admit I didn't temper the chocolate perfectly for these (I was in a rush) but I reccomend that others try to as it would have added an extra level of loveliness to these treats. there are plenty of tutorials on line regarding tempering chocolate so rather than fill this blog with instructions feel free to look it up on youtube.
this is the first time i have made a true soft centre and they worked out well. I made white chocolate and marmalade soft centres, espresso truffles, and mixed nut praline squares. you can make all different flavour combinations with the truffles but the basic principle is you need about 60ml of boiling cream to every 200g of chocolate. if you add any other liquids (eg. espresso) you need to add less cream or increase the amount of chocolate. you pour the boiling cream over the chocolate and stir until as much of the chocolate has melted as possible, if not all of the chocolate melts then just finish the melting process over a water bath.
the soft centres need more cream so they will stay softer at room temperature or as I did you can add another ingredient that once melted will help the mix stay soft (i used marmalade). once the mixtures are nice and smooth they need to be chilled to go as hard as they can. the soft centre then needs to be spooned out into little dollops in some grease proof paper and put into the freezer. these dollops can be rolled into balls once they are frozen. then returned to the freezer to make sure they keep their shape. the frozen balls are dipped into tempered chocolate and left at room temperature until they are served.
I make my praline from the 100 percent nut butters you find in the health food section of the supermarket. there is usually a cashew spread and a Brazil, cashew and almond spread. you just add about 2 tablespoons of the chosen nut spread to the chocolate and cream and melt as I have said above. you can roll it into balls after it has been chilled but I just poured the mix into a lined baking tray and refrigerated it until it had gone hard. then I sliced it into squares and decorated it with white chocolate and pecans.
the coffee truffles are made the same as the soft centre but the mix didn't need to be frozen before rolling it into balls. the truffle mix will go quite firm in the fridge but it is helpful to freeze the balls before dipping them into the tempered chocolate.
Enjoy
Roasted Tomato Soup
There is just something about soup in winter that is ever so comforting. And for me cooking the soup is as much a part of the enjoyment as eating it is. This tomato soup I made recently is just beautiful. It fills the house with beautiful aromatics that cause the soon to be recipients to salivate in anticipation. if you make one soup this winter, please let it be this one.
Ingredients:
12 large tomatoes
6 cloves of garlic
1 leek
2 chillies
1 bunch sage
1 bunch basil
2 tablespoons of capers
Salt and pepper to taste
Olive oil
Method:
Put all the tomatoes in a baking dish, drizzle them with olive oil and sprinkle with sea salt.
Tear up half of the sage bunch and sprinkle that around the tomatoes.
Cut the ends off 3 of the garlic cloves and add them to the baking dish.
Bake the tomatoes, sage and garlic for about 1 hour at 180 degrees or until the liquid from the tomatoes has started to fill the dish and the tomato skins are looking slightly scorched.
When the tomatoes are roasted, take the garlic cloves out of the dish, squeeze the roasted garlic back into the dish and give them a bit of a mash.
Slice the leek, finely dice the chilli and remaining garlic and roughly chop the sage. Sauté all of the chopped ingredients with some olive oil in a large pot, until leak has softened. Pour the entire contents of the baking dish into the pot and add the capers. Gently mash up the tomatoes as you are stirring and discard any large pieces of tomato skin as you come across them.
Let the soup simmer for about ten minutes then season to taste. Chop up 2/3 of the bunch of basil and stir it through the soup until it softens.
This soup is fantastic with my garlic and basil bread.... just the thing for a cold winter’s day. Enjoy
Basil and garlic bread
Ingredients:
4 slices of sour-dough
1 large clove of garlic
1/3 bunch of basil
Parmesan
Olive oil and salt
Method:
Drizzle the bread with olive oil.
Finely grate the garlic.
Chop up the basil.
Mix all the ingredients together with a couple of tablespoons of olive oil.
Divide the mixture over the four slices of sour dough and spread it out to cover each slice.
Grate parmesan over the top.
Bake in a preheated oven at 180 degrees for about 10 mins or until parmesan is golden.
Wednesday, 8 June 2011
Creme Brulee
There is something very sexy about a crème brulee so use this recipe when impressing the pants off of someone is on the menu (you take that as literally as you want).
Recipe:
400ml cream
3 egg yolks
1 whole egg
1/3 cup caster sugar
1 vanilla bean
Whisk the egg yolks and sugar until sugar starts to dissolve.
Split your vanilla bean and scrape out all the wonderful seeds, put the vanilla seeds, empty pod and cream into a saucepan and heat until it just starts to boil.
Take the cream off the heat, pour it straight into the egg and sugar mix and start whisking.
Whisk the mixture so that it’s all nicely mixed through and remove the empty vanilla pod.
Pour the mix into 4 ramekins. Put your filled ramekins into a baking dish and pour boiling water into the baking dish until it comes about half way up the side of the ramekins. Bake at 160 degrees for about 25-30 mins or until custard just wobbles when you gently agitate the ramekin. Set the custards in the fridge for 10-15 mins (it’s best to let them get back to room temp before you serve though) sprinkle the top with a little extra caster sugar and get out your blow torch.
This is my blow torch and yes it does say FAT BOY on it, that’s what you get when you get your boyfriend involved with kitchen purchases........ Hence, my blow torch came from Bunning’s and I am yet to run out of gas!
Enjoy
Sunday, 5 June 2011
Coffee
No breakfast is complete without a nice strong coffee made to order to accompany it. I just love a good coffee so you can image my delight when my handsome boyfriend suggested we get a new coffee machine..... yay!!!!!
Now before I continue I want to make it clear that this is not an infomercial, I have not been paid to endorse the product we chose but I do ABSOLUTELY LOVE IT.
We chose to get a sunbeam CAFE SERIES EM6910. It is a fantastic piece of machinery and I am yet to find a fault. I have worked with commercial coffee machines in the past and the overriding issue, with all of the smaller domestic machines i have used to date, is that none of the parts seem to move the way I expect. This is not the case with this machine. There are 360 degree joints on the steam wand and water spout so that you can move them around to suit the person using them, the warming plate on the top of the machine actually warms up the cups (this just didn’t happen with my last machine), it has a massive 3L water capacity so you don’t have to constantly check the water levels while making coffee and (drum roll please) it has a double boiler which allows you to pour shots and use the steamer at the same time.
I honestly believe that this machine rivals many of the more expensive machines on the market. Everything is where it should be and moves exactly as I would like. The only thing I will say is this is a machine for people who know how to make coffee (or are prepared to learn). I’m not a big fan of the “nespresso” type machines, they are just a bit gimmicky for me but they are probably really good for people who don’t know how to use coffee machines properly and aren’t that interested in learning.
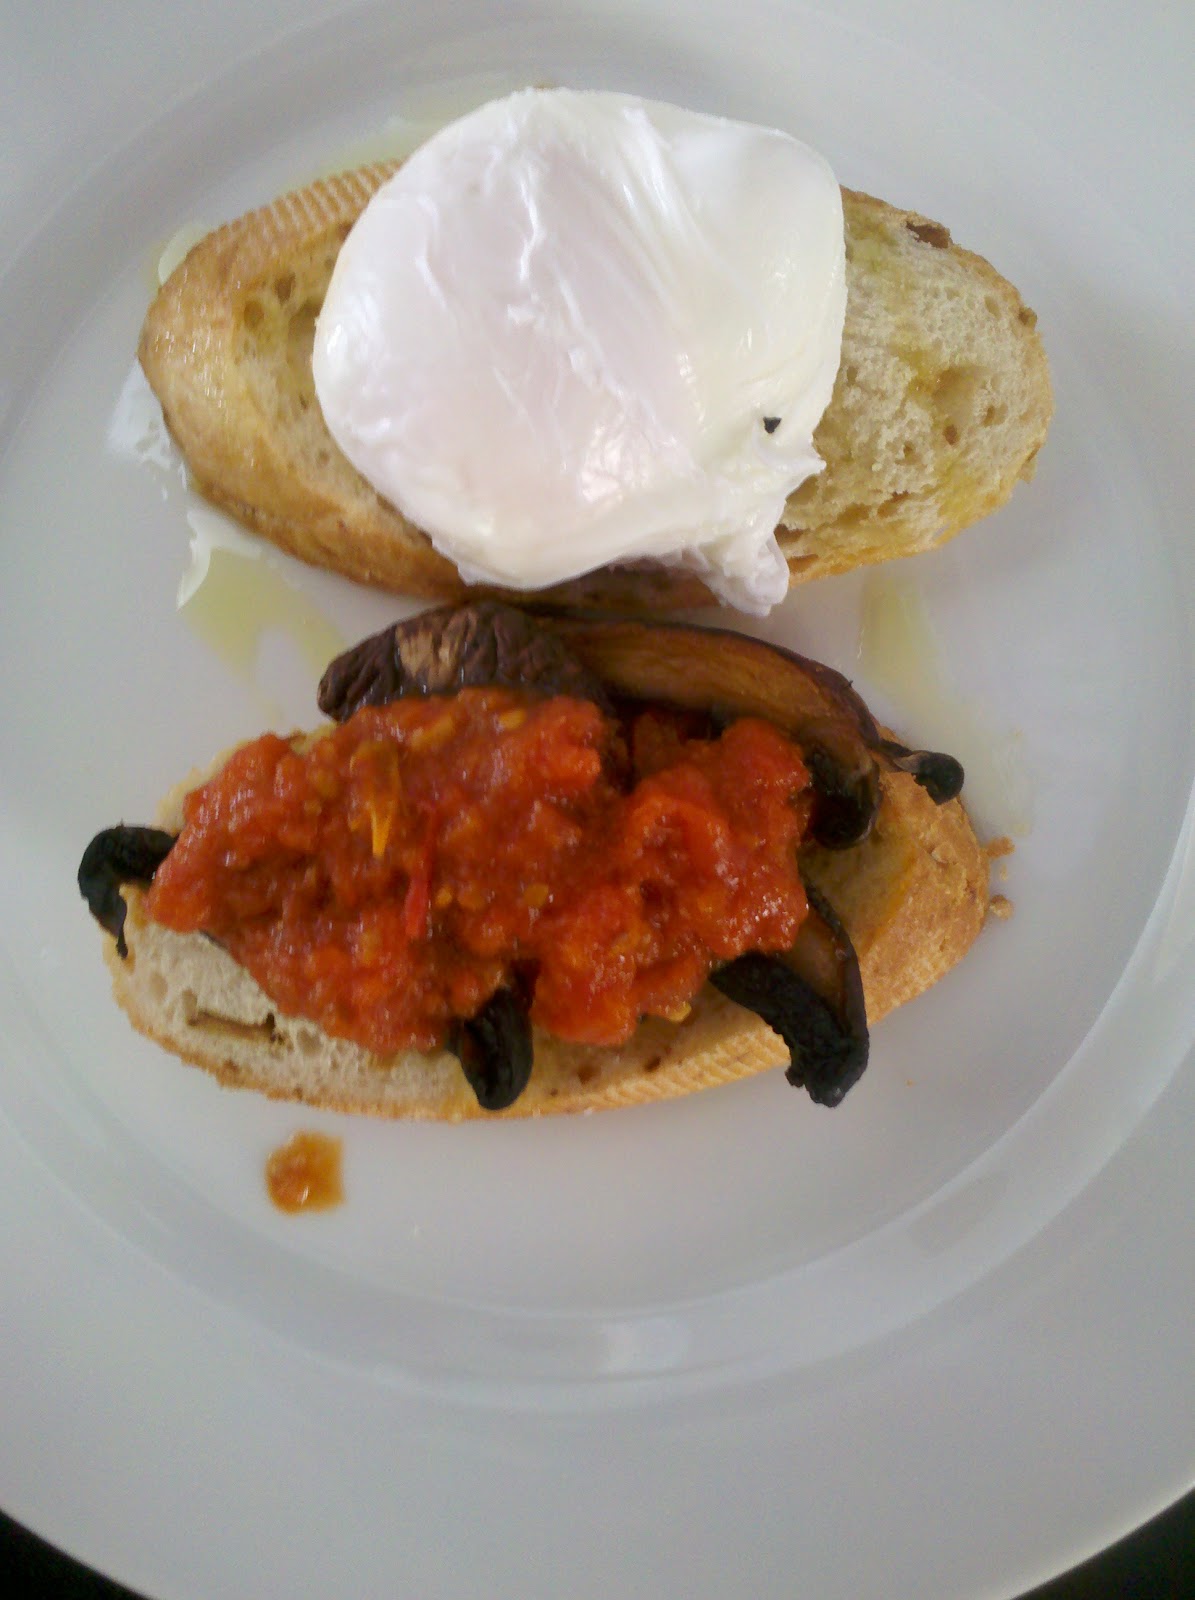
So now that I have finished singing the praises of my new favourite thing let me include this latte as a side to my fantastic bloody Mary eggs.
Ingredients:
6 medium size mushrooms
4 slices of sourdough
2 eggs
Olive oil
Bloody Mary sauce:
1 tsp horseradish
¼ tsp of ground chilli
2 tablespoons of worcestershire sauce
1 clove of garlic
5 ripe tomatoes
Salt and pepper to taste
You need to make the sauce first for this one as it will take the longest and is easily reheated if other ingredients end up being ready first
So here goes, finely dice your garlic, toss it into hot oil with the horseradish and chilli. Swish this all around a bit until garlic is a bit soft but isn’t going brown. Before you burn your garlic add the worcestershire sauce and stir it all up. Add diced tomatoes to the pot, turn down the head and let it all simmer until the tomatoes are all broken up. You can puree this sauce if you want to.
For the rest of the breakfast you need to basically cook some sliced mushrooms toast some sourdough and poach an egg. None of which is terribly challenging although if you don’t know how to poach an egg properly you should really make sure you learn. (Feel free to ask me for tips)
When you have your sourdough toasted put a little of the bloody mary sauce on one slice and pop your perfect egg on top of it then put your cooked mushrooms on the other slice spoon a generous amount of the sauce on top ENJOY.
Thursday, 2 June 2011
Lemon Meringue Pie
It’s an oldie but a goodie! I absolutely love a good lemon meringue pie but have to admit that up until recently I have never attempted baking it. Well recently the craving took hold of me and I was forced to recreate this old favourite of mine. Sadly, I think one of the reasons I had never attempted this dessert before was that I was under the illusion that it was incredibly fiddly and difficult. I was pleasantly surprised to find that this just isn’t the case. Lemon Meringue Pie is quite easy, there you go I’ve said it so all of you bakers out there have no excuse not to try it. I’m rubbish at following an exact recipe so I had a look at several then made my own variation. And here it is.
Pastry:
125g chilled butter
1 1/2 cups flour
2 tbsp icing sugar
60ml iced water
You need to do the pastry first so it has time to bake and cool. rub the cold butter through the flour and sugar until you have a crumbly mixture. pour in the iced water and mix until dough comes together. refrigerate dough for 20 mins or so. roll out your dough and line appropriate pie dish then put pastry lined dish back into the fridge for 1/2 an hour. blind bake the pie for about 1/2 an hour at 180 degrees. allow pie crust to cool before making lemon filling.
Lemon filling:
200ml of lemon or lime juice
Zest of all fruit used to make up 200ml
8 egg yolks
½ cup sugar
125g butter
The Lemon filling is really quite similar to making custard. you just quickly whisk up the egg yolks and sugar then pour the yolk mix, lemon juice, zest and butter into a saucepan and cook on a low heat until thickened.
Meringue:
8 egg whites
2 tbsp sugar
beat the eggs until you get soft peaks then gradually add the sugar while you're still beating the whites until you have beautiful, glossy, mountainous peaks.
Putting the pie together......
pour your lemon mix into cooled pie crust. then arrange large dollops of meringue on top of the lemon mix. you absolutely must make sure the meringue mix covers all of the lemon mix and is spread to the edge of the pie crust. this part is very important, it creates a seal that keeps the sugars from leaking out of the pie, if you don't spread the meringue to the edge you risk getting soggy pastry and no one likes soggy pastry!
bake the pie for around 10 mins or until meringue is golden, let it cool before serving yourself a generous slice.
Wednesday, 1 June 2011
Rhubarb Rhubarb Free Form Tart
Rhubarb, Rhubarb, Rhubarb. My father would often mutter this when at a loss for words as I was growing up. Apparently the line came from a movie that was released the year I was born, a remake of Erik Syke’s 1969 film “Rhubarb” it’s what the extra’s would be told to mutter to give a general sound of background conversations and apparently the only word said in the film. I find it hard to cook with rhubarb without remembering this hence rhubarb recipes hold a fondness for me that offers instant comfort.
I love a free form tart, there is something about them that just wreaks of necessity. Mothers grabbing for the butter, flour and sugar and what ever old fruit they have on hand in order to present an effortlessly glamorous dessert at a minutes notice. This is how it happened for me this evening. I told my boyfriend at dinner that I had some rhubarb in the fridge that I intended to make a beautiful rhubarb pie out of for the following night, his reply….Why not tonight? To that I didn’t have a great answer, so I threw out the idea of making the perfect crust in the perfect dish and steered my recipe toward the more rustic free form tart. I’m not going to give a recipe here just some guidance.
- Use your favourite short crust pastry recipe (a nice sweet one)
- Make sure you chill it before adding your filling
- Cook any old fruit or rhubarb you have on hand and allow it to cool and drain
- Don’t spread the filling out too much, you want a nice amount of pastry left to fold inward on top of the filling
- Dust with icing sugar and serve with ice-cream; I am yet to come across a hot tart that cannot be improved by some beautiful vanilla ice-cream.
I didn’t completely follow step three here (I didn’t drain off the rhubarb properly) so my tart did leak a little. However this dessert did not disappoint, it was a slice of instant comfort.
Subscribe to:
Posts (Atom)